Nikon Capture
 I
shoot exclusively RAW files as it gives me greater control over the final
image, yielding the highest quality possible, tailored to each individual
image. Since I shoot Nikon Electronic File (NEF = RAW), I
use Nikon Capture - the foremost and best RAW editor available at this
time for NEF files. Adobe Photoshop CS comes with Adobe RAW Converter
(ARC), and can do much the same thing with any RAW file. However Nikon
Capture offers greater control, is easier to use, and better image rendering. I
shoot exclusively RAW files as it gives me greater control over the final
image, yielding the highest quality possible, tailored to each individual
image. Since I shoot Nikon Electronic File (NEF = RAW), I
use Nikon Capture - the foremost and best RAW editor available at this
time for NEF files. Adobe Photoshop CS comes with Adobe RAW Converter
(ARC), and can do much the same thing with any RAW file. However Nikon
Capture offers greater control, is easier to use, and better image rendering.
Step 1: Open File
 Of course we need to
first fire up the application and load our RAW file. Of course we need to
first fire up the application and load our RAW file. |
Step 2: Histogram
 The next thing we do is to check the histogram. Verify the histogram
appears appropriate with our particular image. In this example, the histogram
indicates this exposure is about ½ stop overexposed. The next thing we do is to check the histogram. Verify the histogram
appears appropriate with our particular image. In this example, the histogram
indicates this exposure is about ½ stop overexposed. |
Step 3: Exposure Compensation
 We
have moved the Exposure Compensation slider so -0.5 EV compensation
has been added digitally. Nikon Capture supports a live histogram where,
as we are changing a parameter, the histogram is continually updated to reflect
the change. Notice our image now has better contrast, and does not
appear as washed out. We
have moved the Exposure Compensation slider so -0.5 EV compensation
has been added digitally. Nikon Capture supports a live histogram where,
as we are changing a parameter, the histogram is continually updated to reflect
the change. Notice our image now has better contrast, and does not
appear as washed out. |
Step 4: White Balance
 We now apply any white balance corrections to the image. In this shot
there are no neutral areas on which to set a gray point. Additionally
we do not have a reference gray card in the shot. Since it was taken under
ambient metal halide lighting, none of the factory preset settings, nor
the auto white balance settings do any good. Luckily, we took that shot
of the reference card before starting the shooting session. We now apply any white balance corrections to the image. In this shot
there are no neutral areas on which to set a gray point. Additionally
we do not have a reference gray card in the shot. Since it was taken under
ambient metal halide lighting, none of the factory preset settings, nor
the auto white balance settings do any good. Luckily, we took that shot
of the reference card before starting the shooting session.
We simply go back to the reference photo, measure
the gray patch, note the correction values, and plug them in. |
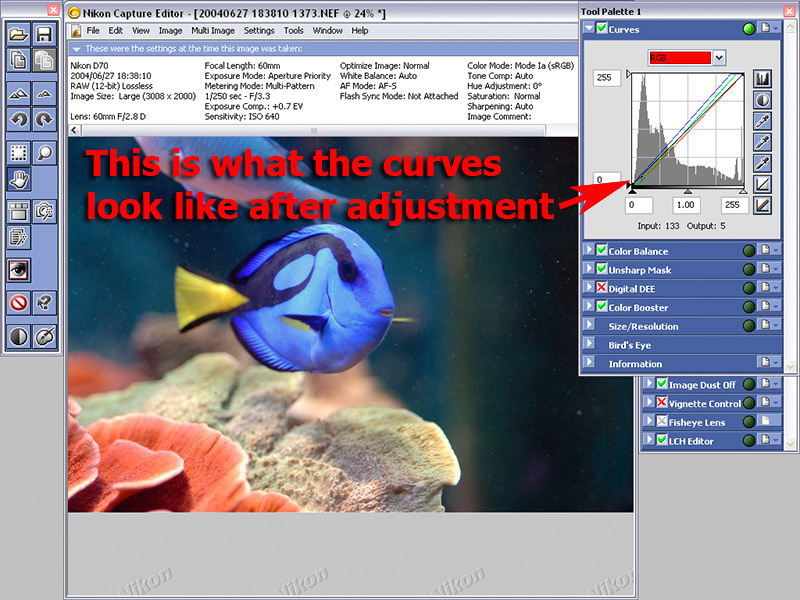
Step 5: Curves
   
Once we have corrected the white balance, we now make
any gamma changes to individual color channels
via the histogram and curves. In the series of screen captures
above, we have gone through this step-by-step. In the red
channel, we brought up the black levels, in the green channel we adjust
both the black and white levels, and in the blue channel, we adjust the
highlight level. This allows us to maximize the dynamic range of each
color channel. The last screen shot shows the sum of our changes.
When doing this, it changes the color response and
characteristics of the image, and as such we want to pay attention to
the image as we are making these changes. We do not want to make
changes so drastic that we destroy our color accuracy.
At the same time we can make modifications to the
curve itself - or the way light is amplified through the range. Using the
peaks of the histogram, we can see exactly which part of the curve we
need to change to bring out shadow detail, suppress highlights, or any
number of changes. In this case, we will leave the curve as it is. |
Step 6: Color Balance
 Now we fine tune the color, brightness, and contrast to our satisfaction. In this example, we do
not need to make any such adjustments. Now we fine tune the color, brightness, and contrast to our satisfaction. In this example, we do
not need to make any such adjustments. |
Step 7: Sharpening Off
 Since we shot RAW, we have the ability to turn off sharpening. We can
do this at any step since all we are doing is changing image
flags - values that tell the RAW editor how to produce the final image
when saved, we have not changed any of the RAW data itself. Since we shot RAW, we have the ability to turn off sharpening. We can
do this at any step since all we are doing is changing image
flags - values that tell the RAW editor how to produce the final image
when saved, we have not changed any of the RAW data itself. |
Step 8: Save As...
 When we select save, the RAW editor will take all the flags we have changed
along with flags that were set when we captured the image and process
the RAW data into an image file. When we select save, the RAW editor will take all the flags we have changed
along with flags that were set when we captured the image and process
the RAW data into an image file. |
Step 9: TIFF
 Here,
we select 16bit TIFF as an intermediary go-between. This format allows
us to make edits and save in stages without degrading the image with cumulative
artifacts. We are using the TIFF as a working file and, with the
essentially unlimited storage space and the fast I/O speeds of our
computer, we are not too concerned with TIFF's space requirements. Here,
we select 16bit TIFF as an intermediary go-between. This format allows
us to make edits and save in stages without degrading the image with cumulative
artifacts. We are using the TIFF as a working file and, with the
essentially unlimited storage space and the fast I/O speeds of our
computer, we are not too concerned with TIFF's space requirements. |
After we have completed all of our RAW processing
steps we have the image below to work with in Photoshop.

|

 I
shoot exclusively RAW files as it gives me greater control over the final
image, yielding the highest quality possible, tailored to each individual
image. Since I shoot Nikon Electronic File (NEF = RAW), I
use Nikon Capture - the foremost and best RAW editor available at this
time for NEF files. Adobe Photoshop CS comes with Adobe RAW Converter
(ARC), and can do much the same thing with any RAW file. However Nikon
Capture offers greater control, is easier to use, and better image rendering.
I
shoot exclusively RAW files as it gives me greater control over the final
image, yielding the highest quality possible, tailored to each individual
image. Since I shoot Nikon Electronic File (NEF = RAW), I
use Nikon Capture - the foremost and best RAW editor available at this
time for NEF files. Adobe Photoshop CS comes with Adobe RAW Converter
(ARC), and can do much the same thing with any RAW file. However Nikon
Capture offers greater control, is easier to use, and better image rendering.